How to Use an Image Map
An image map lets you make different places in one picture open different links. For example, someone can choose the mountain in a map to read about the mountain, or choose the coast to read about the coast.
The short version
Use img to show the picture. Use map to list its link areas. Each area gives one area its shape, position, and link.
Write what the whole picture shows in the image's alt. Write the name of each link in that link area's alt. These two descriptions do different jobs.
Choose a place in the picture
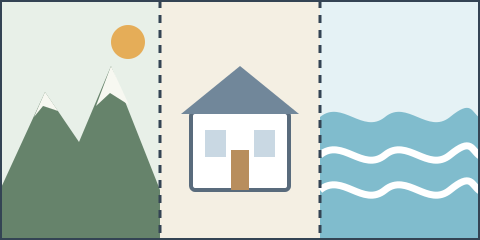
The drawing below has three places: a mountain, a station, and a coast. Choose a place in the picture to jump to its description. You can also use the regular text links below the picture.
A small example
<img src="/images/island.png"
     width="480" height="240"
     alt="An island drawing with a mountain, a station, and a coast"
     usemap="#island-map">

<map name="island-map" id="island-map">
  <area shape="rect" coords="0,0,160,240"
        href="/mountain.html" alt="Go to the mountain guide">
  <area shape="rect" coords="160,0,320,240"
        href="/station.html" alt="Go to the station guide">
  <area shape="rect" coords="320,0,480,240"
        href="/coast.html" alt="Go to the coast guide">
</map>
usemap="#island-map" connects the picture to the list named island-map. Keep the starting #. If you also add an id to the map, it must have the same value as name.
Shapes and coordinates
shape="rect" makes a rectangle, shape="circle" makes a circle, and shape="poly" makes a polygon. The coords numbers describe positions measured from the image's top-left corner.
For a rectangle, the numbers mean left, top, right, and bottom. For example, coords="0,0,160,240" marks a box from the image's top-left corner to position 160 across and 240 down. When the shape or picture changes, check that the links still cover the right places.
If CSS makes the image wider or taller, the areas stretch with the displayed image. If you crop the image or switch to a picture with a different layout for small screens, check every link area again.
Describe the picture and links separately
The image's alt should say what the whole picture shows. Each linked area needs an alt that explains where its link goes or what it does. “Go to the mountain guide” is more helpful than “click here.”
An area without a link is a dead area that cannot be chosen. Leave out both href and alt on that area. A linked area needs both href and alt.
You can also put regular text links next to the picture. That gives readers another clear way to reach the same places without choosing a spot in the image. Check keyboard use and screen-reader output in the browsers you support.
Common mistakes
- The name in
usemapdoes not match themap'sname. - The image's description is reused as the name for every link area.
- The picture changes, but its
coordsstill point to the old places. - A link area is so small that it is hard to choose on a touch screen or when zoomed in.
Mountain
Choose this area to go to the mountain guide. The link area's alt says “Go to the mountain description.”
Station
Choose this area to go to the station guide. The regular text link below the picture opens the same description.
Coast
Choose this area to go to the coast guide. The image's overall description is written in the img element's alt, separately from the three link names.
More detail in Atlas
For the exact usemap reference rules, the conditions for shape and coords, overlapping areas, and browser, WPT, and Accessibility Tree observations, see the Yugien Atlas image maps page. For image meaning and alternative text, see the img element. For regular hyperlink behavior, see the a element.